


Bread Baking 101
Good bread can take any meal to the next level, and it’s even more fun to serve when you make it yourself. We tried out a class with Katie Kring of KatieMade to learn all about the art of baking bread.
By Savannah Waszczuk | Photos by Brandon Alms
Oct 2014
One of my favorite gifts I ever received as a child was an Easy-Bake Oven. I’m proud to say that I’ve come a long way since that first-ever batch of chalky chocolate chip cookies (just add water!), but I’m not so proud of the fact that I have just as big of a sweet tooth as I did at age 8. A sizable list of cakes, cookies, brownies and pies has been on my baking repertoire for a while now, but that’s about the gist of it. If it’s not sweet, I probably don’t know how to bake it.
I’ve dabbled with homemade bread a time or two, but I’ve never had much luck. It always turns out too dry, or too doughy, or simply way too dark to taste anywhere close to good. That’s why earlier this month (and just in time for this special culinary issue), I accepted defeat and turned to a pro: Katie Kring of KatieMade. Kring sells artisanal breads, marshmallows and other baked goods at Homegrown Food and Farmers Market of the Ozarks, and her products are truly some of the tastiest around.
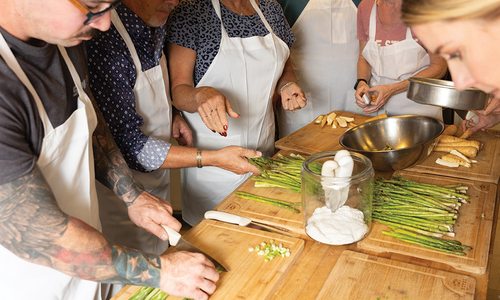
I attended KatieMade’s Introduction to Breadmaking Class last summer. During the three-hour class, Kring explained the art of bread baking to myself and seven others in the kitchen at Homegrown Food. We learned all about things like direct methods and biga methods, gluten development, dough temperatures, hydration percentages and a bunch of other science-y sounding things I would have thought made more sense in a laboratory than in a kitchen. But we also baked bread in this class—lots and lots of bread—and all of her science-y facts proved to be true! When it comes to baking good bread, Katie Kring knows all. To help out all the other bread-baking novices in 417-land, she helped me come up with this list of bread-baking tips.

Katie Kring's Bread-baking Tips:
1. Know the Magic Number. You know how sometimes you must wait for your bread to double in size before you stick it in the oven? Remember this: 17 degrees is the magic number. Dough that will double in size in two hours at 70°F will double in one hour at 87°F or in four hours at 53°F. You can control how fast your dough doubles by adjusting the water temperature and the ambient air temperature of your proof bread.
2. Take Your Time. Slow bread tastes better. If you want to bake fresh bread for an event, make the dough the day before and place it in a refrigerator overnight.
3. Gluten is Your Friend—Develop It! Stretching and folding dough and giving the dough time to rest allows the formation of good strong gluten bonds, which makes a better bread in the end. Get that gluten!
4. Know Your Flour. All flour is not created equal. Unbleached flour, bleached flour, bread flour, cake flour and all-purpose flour are all very different! Pay attention to your recipe, and use what it calls for.
5. Make it Crisp. Ever wonder how to get a great, crispy crust on your bread? Spritz it with water before you pop it in the oven, and spritz it a couple of times during the baking process. This will help create steam and make it good and crispy.
6. Invest in a Food Scale. Did you know that weighing ingredients is the best way to get consistent results in the world of bread baking? Kring’s recipes are actually all measured in weight.
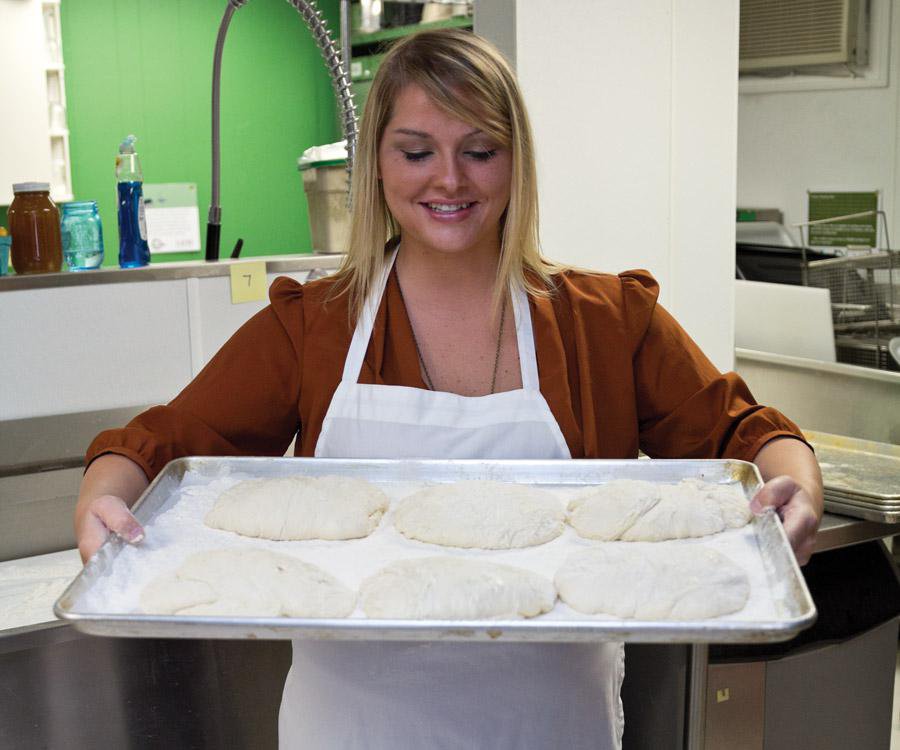
Rustic Old-World Ciabatta Bread by Katie Kring of KatieMade
Ingredients:
16.21 ounces high-gluten bread flower
14.91 ounces cold water
.15 ounces yeast
.44 ounces salt
.29 ounces olive oil
To prepare:
In mixer or by hand, mix all ingredients but olive oil for five minutes until well incorporated. Allow the mixture to sit for five minutes. Add the olive oil, then mix five more minutes. Remove the dough from the mixer and place it in an oiled bowl (note: the dough will be very liquid-like, similar to a thick pancake batter. This is fine). Stretch and fold the dough a few times every ten minutes for one hour, or until the bread is slightly see through when stretched thin. (It should become thicker). Refrigerate overnight. The next day, divide dough into two loaves, and fold each loaf like a letter. Place the loaves seam-side down on a floured tray. Proof for 45 to 90 minutes. Preheat your oven to 425°F. Stretch the loaves into large rectangles. If needed, quickly flip loaves in flour to help with traction. Place the loaves on parchment paper-lined baking sheets, and bake until nicely browned.