


DIY
A DIY Bottle Cap Floor
Crafter Reese Marshall collected thousands of bottle caps, messed around on Photoshop and ended up with a floor as beautiful as any piece of art propped in a museum.
By Jenna DeJong
Sep 2017
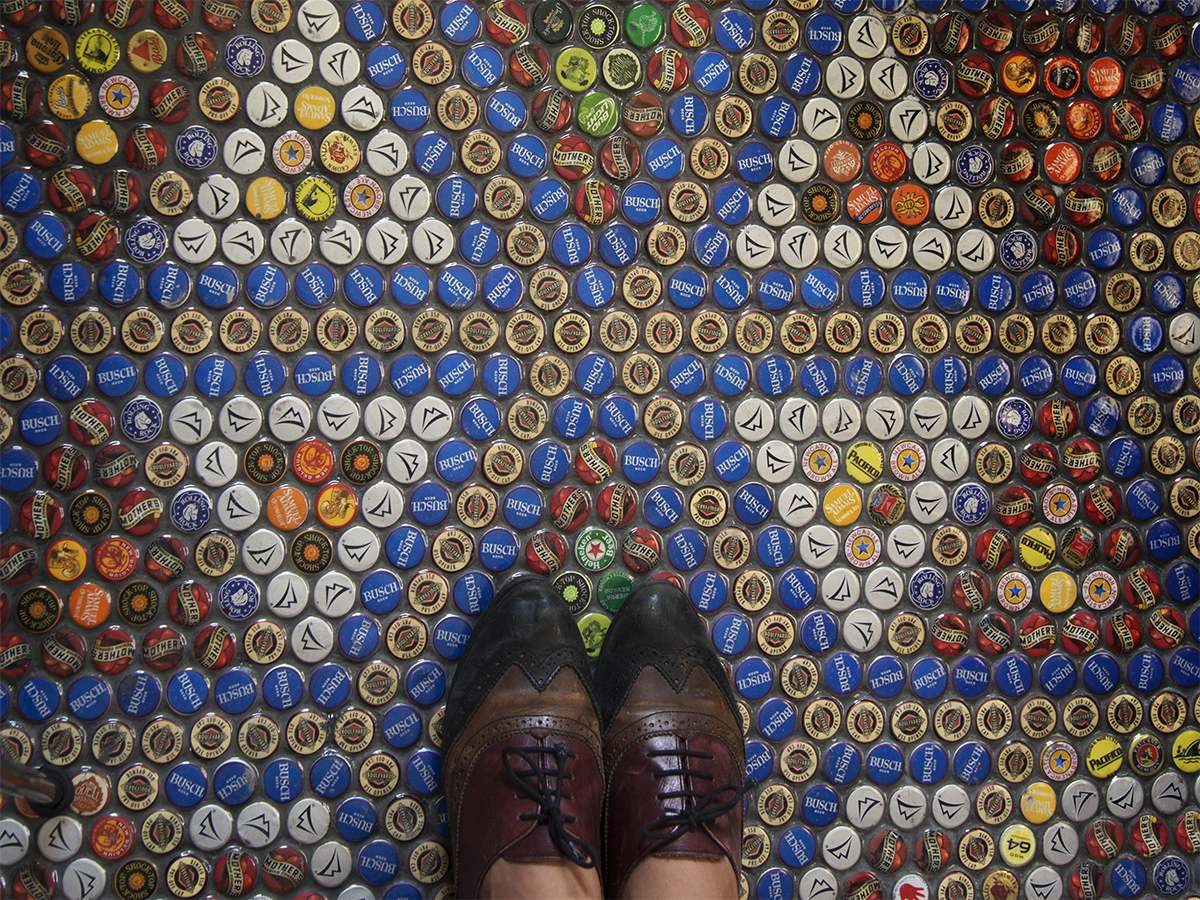
Photo by Halie BransonMosaic like you’ve never seen it before, this bottlecap floor design has a modern twist.
Reese Marshall was scrolling through Pinterest when she got inspired to take on a creative DIY project in her home. She had seen tables and even bar countertops covered with bottle caps, but because she needed a new floor in her office, she decided to challenge herself and expand the project a little more.
Fifteen thousand caps later, she has the floor of her dreams.
She started by asking friends, family and co-workers to collect what they could and visited local breweries and pubs like the Nowhere Bar, KJ Brewskies and Mother’s Brewing Co. A truck driver even dropped off a full trash bag after seeing her project picture hanging in the Nowhere Bar.
The collection alone took her a year to gather, and her only expenses were gas and shipping fees for those sending caps to her from out of state.
Three months later, and with the help of her granddaughter, the bottle-capped mosaic flooring was finished and has been featured on Hometalk, a do-it-yourself website, nabbing almost half a million views.
Marshall says the satisfaction of creating something beautiful with her own hands is what she enjoys most.
“I enjoy producing the unusual for little cost,” Marshall says. “I get immense satisfaction in having a need for something, finding an inexpensive solution then weighing the outcome of the reactions of friends and strangers.”
Do It Yourself
Supplies
Thousands of bottle caps
A hammer or pliers (something to reshape bent caps)
Cement backer boards
Power drill
Screws
Ceramic tile cement
A long, thin piece of wood (to use as a guide stick)
Sand-free black grout
Rust-Oleum Varathane floor finish
Paint roller
Directions
1. Reshape the bottle caps with a hammer or pliers if they are used and sort them by color.
2. Pull up old carpet and pull or flatten any nails or staples from the subfloor. Measure the flooring. Marshall’s was 12 feet by 10 feet, so if your space is larger, you’ll need more bottle caps.
3. Lay a cement backer board and use a power drill to screw it to the floor. Carefully fill cracks and edges with cement so the flooring is flat and smooth.
4. After screwing a guide stick to the floor to establish a center, begin laying out your pattern.
5. Fill bottle caps individually with cement. To make this easier, pour cement in a Ziploc baggie and seal. Then cut a small hole in the corner for more control. Keep the section of flooring you are working on moist. Use your pattern for reference. Let dry when finished.
6. Let one side dry overnight before removing the guide stick to repeat on the other side. Repeat step five until finished with the entire floor. Cut wall edges to fit properly.
7. Use grout to fill in the spaces between bottle caps. Make sure it is smooth. If bubbles appear, go back and fill again. Clean as many times as needed to remove the cloudy glaze.
8. Spread the Rust-Oleum Varathane finish over the floor with a paint roller to seal and shine. Repeat as needed. Marshall used the entire gallon for better results and plans to apply another gallon every year.
9. Let the flooring dry for two to three days before moving furniture in.